Why do I need to run a local server?

This is because a website is more than just a static folder on a computer: there are some dynamic parts, too, that change all the time depending on what device is used or who is accessing the site, for instance. Two tools work together to display the webpage you see: the browser you’re using on your computer, and the server on the other side of the planet.

The browser and the server split the load of preparing the page among themselves. Of course, the final display or rendering is on the browser side. But the browser can’t do everything. What the browser can’t do, the server does and “serves”.

Let’s say you have an extremely basic browser that can’t do any of the “smart stuff”.

Even the simplest pages, say a title, a line of text, and a picture, rely on three files or documents:

  • the html file that contains the title, text and reference (or location) of the picture
  • the CSS file that contains the formatting that should be applied to, say, the title (large & bold) and text (normal and normal).
  • the image file, typically a .jpg or other file.

In olden times, the html file would also include the information that the CSS file had, but it was very cumbersome: say you wanted to have titles underlined in addition to large and bold, well, you had to search & add “underlined” to every single title in the file. Sure you wouldn’t forget a few?

Anyways, what a server does in this case, is that is “serves” the result for the browser to read and show. So it takes the html file, reads through it, and every time it sees “title”, it adds the relevant CSS instructions for that line: large, bold and underlined. Then, it irons it all out and sends the nice, complete html page to the browser which can display it without any difficulty.

So when you’re working on your local computer only, you need something to take on the responsibilities the far-away server usually has. That’s where the local server comes in.
How to set up a git repository between a website server and a local computer?

This are the steps to set up a repository between a website hosted on a server and a folder on your local computer.

First, git must be set up on both the server and the local computer

On the local computer, it’s easy, I just installed Github and that was it. I had created a logon on the github website first, so I entered the same credentials in the software when asked.

On the server, it’s a whole new world. Hope I’m brave enough for it!

How to set up git on the server side

Actually, when people say this, they mean something much simpler than it sounds. They mean “how to simply give git access to the server”.

Indeed, git needs to jump through the authentication hoops to be able to read, track, and modify files on the server.

The safest way to do this is to give git the key to the server.

Allow the server to respond to security tokens

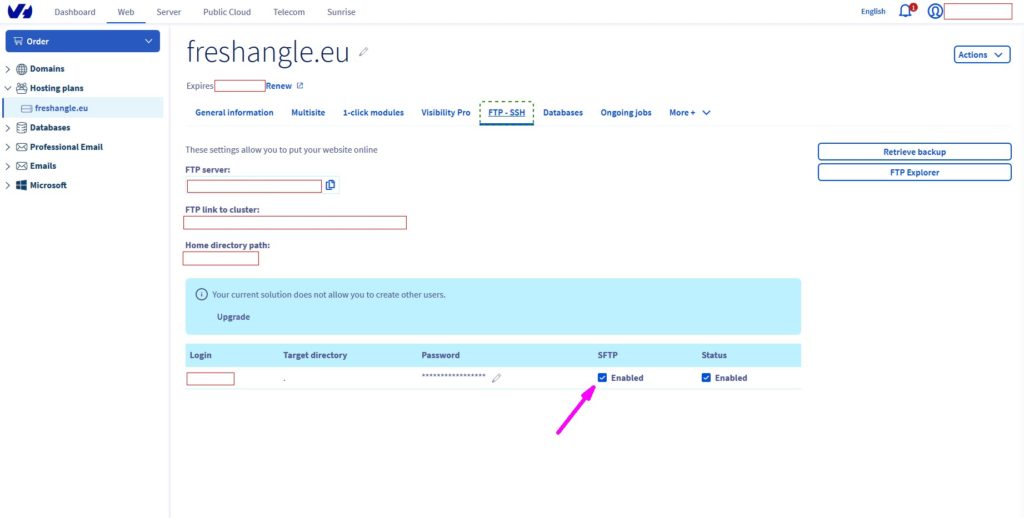
Servers need to be configured to make this possible. Indeed, by default, they don’t allow access to tokens. So you have to head to your server provider’s website, log in to your account, and navigate to the domain of the website you manage. From the dashboard, a tab or link shows “SSH/FTP” access, that’s where you can activate the option (usually free) to allow connection to the server by a remote user without requesting the password every time thanks to a token or key.

Hmm. At this point, after some searching, I realized it was necessary to perhaps install what’s called a “local server environment” on my own computer. After all, that’s what’s needed to be able to emulate or pretend your local computer is a server when reviewing and working on the website.

What is a repository on Git?

A repository is this set of folders that is tracked and synchronized. Contributing to the repository means changing it: adding or removing files, or editing them.

Usually, the repository encompasses all the files related to a project. It’s thus connected to the highest-level folder of the project.

Git creates a subfolder called “git” within this high-level project folder. In this folder it stores all the modifications and changes that occur within the entire project folder. Deleting the “/git” folder means deleting the history of the repository… so you’d only be left with the project in its actual state, without ever being able to revert or document past changes!

In itself, deleting the /git folder shouldn’t crash the website or project.

Me again.

To sum it up, the repository is the project folder. There’s always a master folder which serves as a reference, and sometimes there are secondary folders (slaves, in the parlance). Changes among these are tracked by Git and written out in the /git folder on each device.

The difference with dropbox or other cloud-based storage folders is the following: Git enforces a stricter protocol to validate and attribute changes. In order for a change to take effect, the developer has to “commit” the change, otherwise Git simply won’t change anything. In addition, the repository owner has to validate the committed change, and merge it back to the master folder. That way, responsibility is traced and it’s easier to revert issues.

Sometimes repository is shortened and people talk of “repo” instead.

What is a staging server?

A “staging” or “pre-production” server is a server that hosts your website in the same environment as your production or active server. However, access isn’t public and it’s restricted to developers and persons who test it.

You might confuse this with:

  • the rpo

Advantages of having a staging server

Basically, it’s a copy of your website that runs on exactly the same infrastructure as your main website. This means the server is the same, the systems working throughout the website are the same, and so on.

When you’re updating or modifying your website, sometimes it might work on your local computer, but when you upload the changes to the production server, it crashes because of some obscure unforeseen subroutine that is specific to that server environment. Testing the change on a staging server helps reveal those problems before going live.

Container for Google tag manager

Deciding where to put the container in case of multi-domain websites depends on two things:

  • how independent are the domains? By this, view it from a user point of view: will a user need to navigate from one to the next seamlessly, or will this never happen?
  • how many tags are common to both?

For instance, a website with two domains in different languages managed independently will almost never have users “cross sites”, except if they’re bilingual and want to compare information within both websites. This would push to set up two different containers, one for each language domain.

However, they might be sharing a few tags such as Analytics or certain marketing tags. For this, it helps to map out which tags are already in use on both domains to see how much overlap there is.

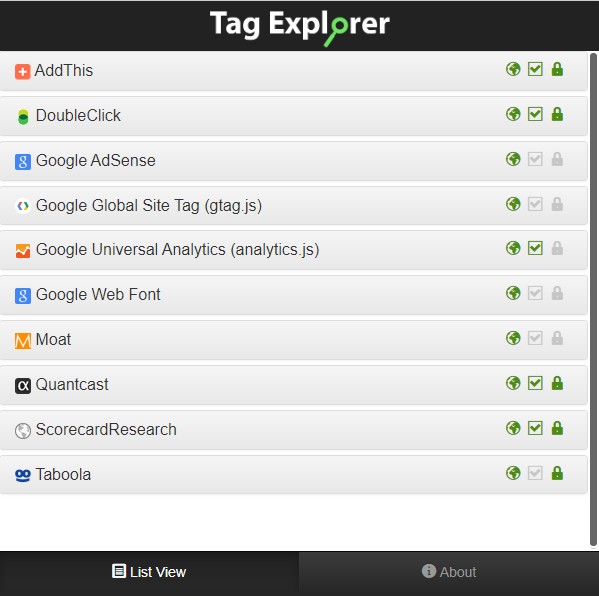
Using Chrome with the Tag Explorer extension can give you such a result:

Here, 10 tags were fired.

Google Global Site Tag (gtag.js) works with Google Universal Analytics (analytics.js) together, the former monitoring and pushing event-related information to the second, which logs user behavior. As for the rest, it’ll take a while to learn what they’re for!

Day 2, google tag manager vs hardcoding tags

Well, thanks to analytics mania I learned that using google tag manager seems to increase performance vs simply hardcoding the tags in the page header.

In the end, there are only three ways of adding a tag to a website:

  • hardcode (type) it in the website header code. Disadvantage: you need to code or rely on a developer for every change.
  • add it through the WordPress interface, when “customizing the theme”, there’s a place where you can add “additional html or CSS” text. Disadvantage: if you change themes, you likely have to re-paste the tags, I suppose.
  • use a “Tag manager” which is fired upon page load and fetches the tags in the list. I thought this solution would be slower vs hardcoding because it’s essentially bringing on a third party, but thanks to the link above, it seems it isn’t, at least when that tag manager is Google’s.

Guess who’s gonna set up a Google tags manager?

FreshAngle, online day 1, yeah

FreshAngle.eu will have several goals, and the first is simply to get started with an online presence. Succeeded today in setting up the website, creating the database and first basic theme with zero customization. Not bad for a start!

It wasn’t easy, but if I hadn’t tried I wouldn’t have made it.

Me, today, ‘course

Confusing aspects:

  • Database required before launching the WP module.
  • Lots of logins and passwords needed: ftp access, database access, and of course WP admin access. All done!
  • fresh install still requires updating themes, WP itself, and plugins.

Next goal: set up a repository to make it easy to track and practice changes to CSS, plugins, and other things, and reversing them, too.