Git lets you track and synchronize files between a local folder on your computer and another folder somewhere on a server. Usually, this faraway server folder is called a “remote” repository. In git conventions and traditions, this faraway reference remote is often called “origin”.
Here is the command to add or reference this with git.
Using the terminal, navigate to the folder on your local computer that you want to synchronize with the remote one.
If it’s already got some type of tracking set up, you need to follow a different command to change the existing origin remote on git. Adding a new remote with the same name won’t work.
If you’re setting up your “origin” remote for the first time in a given git folder, type the following command:
Typically, you use this command and procedure when setting up a local environment to develop a wordpress website that is already up and running. Local tools such as VVV create a server and pre-create a placeholder website in the process. Then, when the local server is up and running, you can swap out the placeholder website with your actual working website, for which you’ve already got a repository that’s being tracked somewhere, like github or gitlab.
I just successfully connected my first locally-hosted website to a copy of its production database, but when I try to log in to the backend, it redirects me to my production environment. Why?
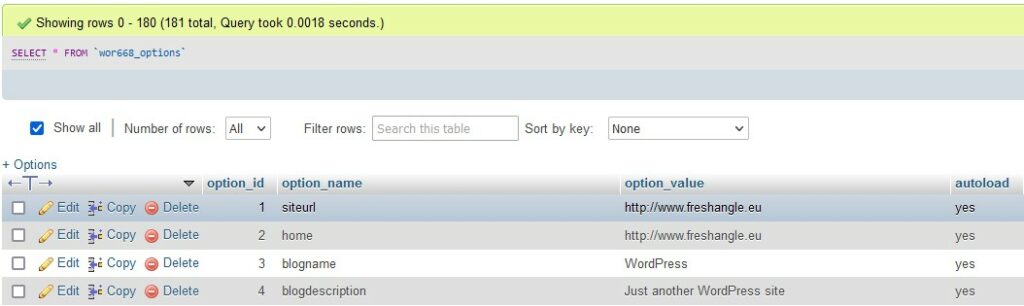
The solution is to fire up myPhpAdmin, open the wp_options tables (or yourWPprefix_options table) and change the entries in the first two lines of the table. Replace the production URL with the local URL.
Screenshot from myPhpAdmin running in browser
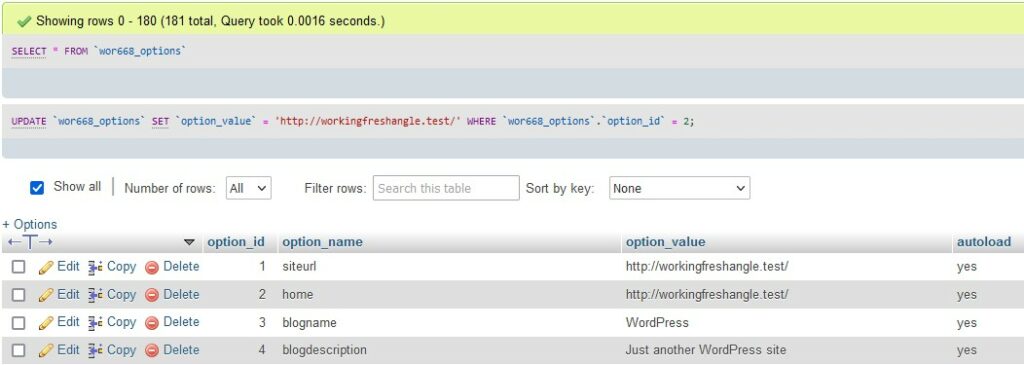
In myPhpAdmin, you can either click the “edit” button at the left, or double-click the text you want to change. In our case, “http://www.freshangle.eu”. Here is the table after replacing these two values:
Screenshot from myPhpAdmin running in browser
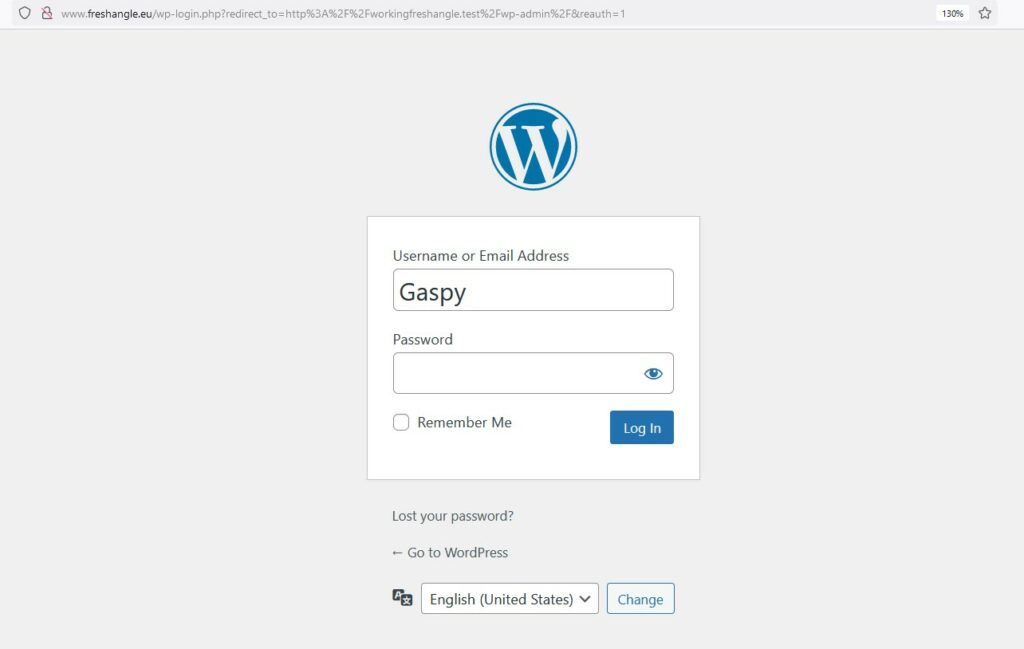
Now, when I add /wp-admin/ to my home URL, it opens up the backend on my local computer instead of sending me back off to production.
Here’s a screenshot of me logged in to my local backend, not the production one anymore:
Screenshot of my local WordPress backend, logged in on my browser
This is exactly what I need: I can now update WordPress and plugins, test plugins out, all on my local computer. It won’t affect the production server at all. After I’ve tested things out, I can either go repeat the final update sequence on my production server directly, or simply push the final changes up from my local repository through git.
wp_options is one of the most basic tables of any wordpress site. It contains key references about the site itself. It doesn’t include any of the normal content like posts or images.
The wp_options table is unique among WordPress database tables in that it doesn’t share a relationship with any of the other tables. This is because it stores data about the site or network, and not the content. To interact with the options table, you can use the functions in the Options API or the Settings API, and you can also make use of functions which add data network-wide in a Multisite insulation.
The first entry in this table shows how crucial it is:
First line and entry: site URL! Second: home page!
This table is where all the key identifiers and settings of the entire website are stored.
Plugins also add entries in this table: indeed, that’s the place where each plugin is tracked upon installation. Key parameters for each plugin may be listed here, too.
Also, this is where the solution to one of my first programming problems can be solved: local wp-admin login page redirects to live production server instead of local backend.
I’m trying to use VVV, a Vagrant project dedicated to WordPress, to learn and practice developing a local website.
A few days worth of looking and learning led me to understand one of the key things to transfer a database from one server setting to another.
Indeed, VVV recommends setting up default websites from files pulled out of their github repository. These default websites have names like wordpressone.test or wordpresstwo.test. I made a third one with my own site name, workingfreshangle.test, that had the settings of their standard “mytest” option. I simply un-commented the relevant lines in the config/config.yml file and replaced “mytest” with “workingfreshangle”.
It worked, in that I had the content of their standard “wordpresstwo” website on a local URL called “workingfreshangle.test” .
It honestly took me a while to get that far, since I first thought I could save time by trying out their options to clone an existing website repository, which I already have set up on github for my freshangle website (private). For example, I twice uninstalled and reinstalled both Vagrant and VVV because I messed up with so many configuration files that I couldn’t remember which ones to replace with default files and which to leaves because they were as yet untouched. On a slow internet connection this is frustrating.
The next step was to hollow out the default website and replace it with a copy of my own.
There are two parts to this:
the WordPress install files, which include the theme set up on my original server.
the database itself. My server provider stores the database in a different area, so it isn’t in the same place as the other WordPress files.
First, I tried connecting the database up. I found out how to download a backup of my database, and what the basic database information was: database name, authorized user and the user’s password. I’m still a bit confused when it comes to the database host, because the “Database server” address didn’t seem to pull through. I suspect, though, that this is just because I only have a “Pro” plan with OVH, my provider. They had already denied me SSH access when I had the “Personal” plan – and it took me a whole day to find out that I needed to upgrade to pro just to have my SSH access. There wasn’t a single mention of this in the error messages I got when trying to ssh “in” my server.
I don’t like it when major corporations make things confusing. And I also don’t like it when you have to have an upgrade just to be able to do one of the most basic things in web development. It’s kind of like buying a car, then having to upgrade once to be able to back up, once more to be allowed to use the gearbox or cruise control, and yet another time for them to grant you access to side and rear view mirrors. All while never telling you that these options you’ve been reading documentation and forum questions about are simply not included in your plan!
So anyway I realized that no amount of tweaking the config file could get my local instance to fetch its data from the remote server.
As a fall-back, I decided to download a back-up of my website database, and install that on my computer in such a way that my local server and browser could access it.
OVH quickly sent me a file with my database back-up, which I downloaded. It was a .gz file, which no native Windows app can unzip. I was tempted to ditch Windows for Linux at that point. Developers always assume linux, so that would have spared me lots of time seeing whether their answers could be transcribed into Windows. I decided to download 7Zip instead. It worked and gave me a file with no extension. I could open it in sublimetext. (I later saw that I could import the file while still zipped, which would have saved me a few hours).
I had no idea what do to with that extension-less database mysql dump file. None of the VVV documentation explained where to place it or how to integrate it into the VVV image. The closest hint was this sentence :
I will probably realize in 6 months that this is of course something very basic, like A-B-C simple. But I don’t know that yet, and it’s frustrating, especially for something as noob-targeted as WordPress, which VVV purports to facilitate.
Hey @woshj you can use Sequel Pro or PHPMyAdmin to import the sql file. Keep in mind that an sql file isn’t a database, it’s just a text file. with. all the SQL commands to recreate the tables and their. contents. You can access PHPMyAdmin via the VVV dashboard on the righthand sidebar, and. there’s a Sequel Pro connection file in the database folder you can use to set up Sequel Pro fast
You will also need to adjust your wp-config.php to have the same salts as the production site, otherwise the passwords won’t work. The same goes for all the plugins and themes.
You might also need to do a search replace on your database after importing to change the production site URL to your local URL.
but now just displays a blank screen
Check your PHP error log, but, keep in mind that if your production site uses the ABC123 theme, you will need that theme to be present or WP. won’t be able to load it and you’ll get a blank frontend.
Fundamentally, there’s nothing VVV specific about this, if anything, standard WP migration guides and techniques should work for you.
the importing of my downloaded database backup file must be done in phpMyAdmin. Open phpMyAdmin from the vvv.test dashboard. Login and password are whatever you set them to be in vvv-local/database/sql/init.sqo
I would need to delete the innards of the standard default workingfreshangle database, and then import my backup inside it.
To delete the innards, on the left side panel of phpMyAdmin, select (click) the default database you want to eviscerate, like so:
And then, to empty it, select all tables with the Check all button, and in the drop-down list nearby select “Drop”. It prompts you with a red message, checking whether you’re really sure you want to delete all these tables, click yes after verifying that you’re on the correct database.
Then, an empty database name appears, with no tables. At this point, click the import button. That’s when I went to fetch that weird extension-less file and it loaded into the empty database, populating it with tables and all!
Hooray!
Almost. There was no more database error, but there was still a problem: blank page.
Luckily, the quote from above catered to that small issue:
if your production site uses the ABC123 theme, you will need that theme to be present or WP. won’t be able to load it and you’ll get a blank frontend.
Quick check on production server, my current theme is twentynineteen. The three default VVV-loaded themes are twentytwentyone, -two and -three.
Quick check: though the screen is blank, I am able to call up the /wp-admin/ page, and log in there. Interestingly, it still refers to the original website for authentication, but the URL seems to show that it will redirect me back to the local version of the site once I’m in. Let’s see.
Dead end. That just logs me back in to the production admin back-end. Sorry for raising your hopes there.
Next thing: copy over current twentynineteen theme files from production to my workingfreshangle local folder, next to the three existing theme files.
All right, finished copying. Now will test the workingfreshangle.test again.
Hooray! This time, it works! The whole website appears. The twentynineteen theme displays properly. The content is as it was when I did the backup.
Since I’m writing this post from production, I’ll just go ahead and publish it. Normally the content on the local site shouldn’t change.
Correct! See screenshot below: both websites are active, the unupdated local (left) and the updated remote/production server (right)
Summary:
Install Vagrant, VirtualBox, VVV.
Modify the config/config.yml file, uncommenting and replacing “mytest” with a name for your own project. In my case, “workingfreshangle”
Run the vagrant box with vagrant up --provision
From your web hosting provider’s dashboard, download the most recent backup of your database. Unzip it (or not). Check the table prefix and jot it down. In my case, I didn’t need the database name nor the username/password.
In the newly created www folder, find the folder for your own project (“www/workingfreshangle” in my case), enter the /public_html/ folder, and open the wp-config.php file. Modify the table prefix to the one you noted just above.
From the VVV dashboard, open myPhpAdmin by clicking on the button (username and password are defined in vvv-local/database/sql/init.sql). Navigate to your working local database, and clear its contents by selecting the tables and “dropping” them.
With that same (empty) database still selected, import the backup of your production site.
At this stage, clicking on your test website’s link from the vvv dashboard might get you a blank screen if themes don’t match.
Copy over the relevant theme folder from your production server or repository to wp-content on your local computer inside the vagrant VVV folder. Voilà!
Last thoughts:
There must still be something wrong, because I didn’t use my original database credentials given to me by my website host provider.
Also, trying to log in to the back-end will redirect me to the production website.
Edit: it seems this last problem might be related to the wp_options table: that’s where basic information related to the website is stored. It doesn’t contain anything about content (no posts, users, uploads, etc).
In the git repository for your website, there’s a .gitignore file. It lists what files you don’t want to track as part of the repository.
There are different things you might want to ignore:
small temporary files generated by the operating system your repository is on. For example, thumbnails or cloudsync files.
important information that should not be made available to anyone who can access the repository: passwords files and access files like .htaccess
anything that is not within your powers to change:
user-generated information that isn’t related to coding, such as blog posts, uploaded pictures, and the like. Tracking these will make it a hassle to know if you’re up-to-date between your repositories, since they’ll change/add constantly to the number of files.
If you’re only developing a wordpress website for yourself or a client, you’re not involved in modifying the core wordpress files themselves. These might change as you update to higher releases of wordpress, but they’re not something you want to track as part of your own development work.
this may include basic wordpress themes you are using and plugins you are using. However, if you are developing your own child themes and plugins, you’ll want to track those folders specifically that contain your own work, so you exclude them from .gitignore (meaning they’ll be tracked).
Git is for tracking code. To protect, retrieve or reset an entire website with all its content, try a backup software/protocol/system instead. Though it could work with git, it’s impractical since you’d basically have to commit and validate every new picture or user-generated file every time.
Creating a repository for code with Git means you want to track changes that are made to that code. Git works by tracking files in the folder it’s set up in.
Often, though, there’s more than just code that is included in the folders. For instance, for a website, there’s content like blog posts and pictures.
It is important to remember that git is for tracking and saving code. It’s not suited to tracking and saving content. For that, you’d need a back-up system that will work more efficiently.
To tell git not to track some of the sub-folders, files or datasets, you create a gitignore file. In it, you specify which individual files to exclude from tracking. You can also specify patterns, to exclude groups of files that have matching filenames. Lastly, you can specify entire subfolders.
The file itself is simply a file called “.gitignore” and each line is a new entry:
# Exclude these files from the git repository
wp-content/backup/*
wp-content/cache/*
wp-content/upgrade/*
wp-content/uploads/*
sitemap.*
Composer (see here) is a system to organize your PHP code. With this system, you can create or maintain PHP files by referring to snippets that are stored in different places. This is called “dependency management”.
Basic building blocs of PHP code can be stored in “libraries”. Libraries can be shared across projects. If they’re hosted on a server, you can access libraries that other people wrote. You might want to refer to libraries and code snippets that you’ve created for other projects.
Composer is practically both a database and a compiler:
Database: it stores the names and locations of PHP code snippets. It’s like a directory or address book in this respect.
Compiler: given proper instructions, creates files by concatenating referenced snippets.
Composer works from (relies on) a composer.json file.
The advantage of using such a system is that you don’t need to repeat any functions throughout your code or project. It’s enough to have coded it once, you can call it again to build/create different files that might need it.
For instance, if a multisite-website has 4 different websites but you want the same information to appear in the header of each, you can use composer to
create the header.php file adapted to each website,
place it in the right destination folder,
all the while relying on code that has been written only once
so you don’t have to do any dangerous copy-pasting.
We’ve been over some of the softwares, systems, and logins that are part of a developer’s life. As everything in this world, things change (hopefully for the better).
Here are quick guidelines on how to update the different softwares we use.
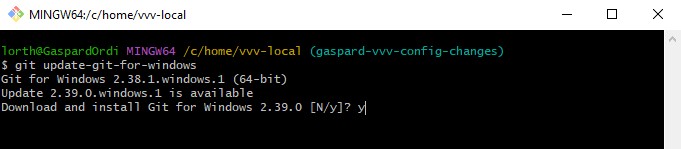
Git for Windows
This helps use the git protocol on a windows computer. In a terminal, from anywhere on your computer, type:
git update-git-for-windows
Screenshot of the git update for windows command on git bash terminal
The most current version, as of December 2022, is version 2.39.0.windows.2
To check which version of git you’re running on windows, type:
git --version
Updating Bash
Gitbash is the software that lets you run a terminal to work with the git protocol. Alternatives are Windows Powershell (another command-line terminal) and Git GUI, the button-clicking interface.
Bash updates are included in the Git for windows updates. Running the above command will update both Git and Gitbash, and even GitGUI which is part of the installation.
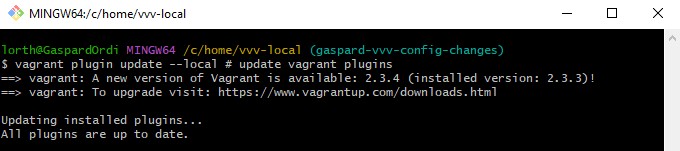
VVV, the Varying Vagrant Vagrants and Vagrant
This is the list of instructions and files that tells Vagrant how to set up Virtual Box to emulate a server. From the folder where Vagrant is set up, usually C://users/yourusername/vvv-local/, run a terminal and type:
After a few instants (seconds on slow connections), you should see “Updating installed plugins…” appear on the next line of your terminal, and it’s processing stuff in the background. When it’s finished, 2-3 minutes later, you get the message “All plugins are up to date.” and your terminal is responsive again.
Screenshot of the vagrant and vagrant plugin update windows command on git bash terminal
Checking which Vagrant version you have
The most current version:
of vagrant is vagrant 2.3.4
of each plugin
Check which version you’re running with either of the following commands:
vagrant plugin --version
vagrant plugin -v
Note the double dash for the whole word, and single dash for the abbreviation.
If you’re not running the latest version for vagrant itself, you must download it again and reinstall it from Hashicorp’s vagrant page. Check what’s new in the release from the github project directly, for instance here for the 2.3.4 version. I recommend keeping the default directory for installation, C:\HashiCorp\Vagrant\
This requires a computer reboot after installation.
Checking which VVV version you have
VVV, or Varying Vagrant Vagrants, is the set of instructions that tells Virtual Box what type of server to run. It also sets up basic local websites and/or websites you intend to work on.
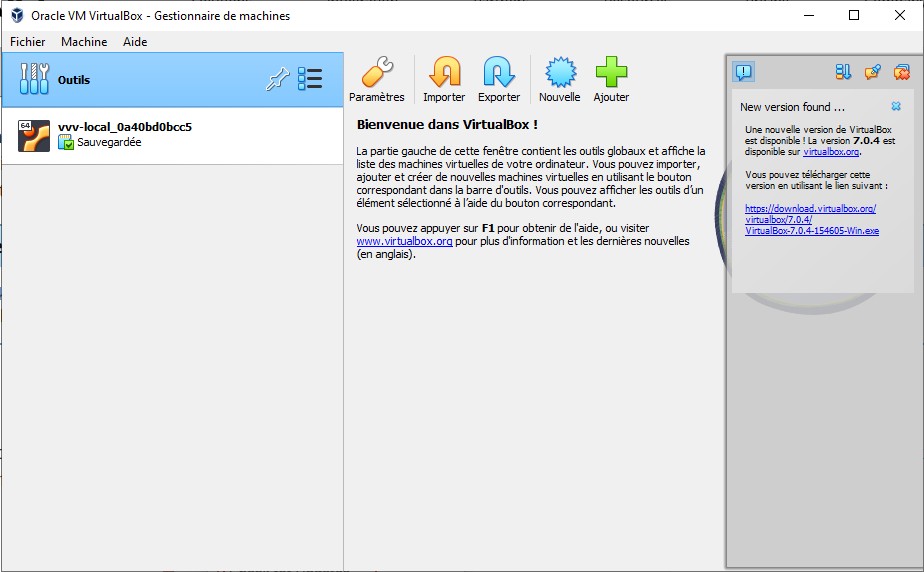
Updating Virtual Box
The simplest way to check and update Virtual Box on Windows is to open the software and in the File Menu, select “Check for Updates”. A sidebar appears on the software, it mentions that there is a new update available.
Screenshot of new available VirtualBox update on Windows
Simply follow these steps:
click the link and download the new version
close VirtualBox and gitbash if they’re open
check that you’re not downloading anything important because installation closes the connection for a few moments
run the installer and say OK to validate network interruptions, etc.
The most current version as of December 2022 is 7.0.4-154605
Do you want to combine several options when running a command in a terminal? Just type them in right after the command itself, before the main parameters. Remember to type the hypens, too:
$ grep -r -i -l --color -a mystringtolookfor *
The nice thing is that you can collapse all the options together, as so, at least those with only one hyphen:
$ grep -rila --color yieldlove *
Note that some commands can’t be combined. Perhaps they’re not compatible, or they’re mutually exclusive.