Modify the number of tables displayed in phpMyAdmin (increase-decrease)

To modify how many tables appear:

  • click on the home button to call up your phpMyAdmin main page
  • click on the “settings” tab
  • click on “Features”
  • select the “Databases” tab
  • in the “Maximum tables” row, modify it to however many you want.

Default value is 250, which is also the in-built default maximum value.

If you type a value higher than this (which you often want to do if you have a larger database), you’ll get the following message:

To increase this maximum value, you have to modify the configuration file for phpMyAdmin. This file is called config.inc.php, and it’s located on your server where your database is, at the root level of the folder that contains your database.

The code you have to write in this file is: $cfg['MaxTableList'] = 500; or however high you want to set it (1000, 5000…).

Note the semi-colon to close the statement.

git push a branch to remote repository

You quickly get familiar with pushing your local master branch up to your origin remote repository:

git push origin master

You can send up a “side” branch that isn’t the master to your remote repository just as easily:

git push -u origin name-of-side-branch

Note the extra -u which appears before origin. It is short for --set-upstream. Since you’re sending your branch up for the first time, this information tells git to link your local branch to that new one on the remote server for all future updates (fetch/pull/push) between the two. Setting it lets you run other commands without having to retype all the arguments every time (ex: git push will be enough to update the origin again, instead of git push origin name-of-side-branch).

In the end, it shows that master or main is just a branch like other branches. It’s just that over the years that people collaborate, it makes sense to use the same name across different projects to refer to “that-branch-which-everyone-pushes-and-pulls-to-and-that-represents-the-official-stable-version”. Hence, main or master.

why is my local wordpress redirecting to production

It’s rare to start a website from scratch. More often, a developer needs to install a local wordpress environment to work on an existing website. After setting up a virtual server on a local computer, and copying over the theme files and database, nearly everything is ready to test that the local setup works.

At this point, you’d expect the local url to lead to your local page, but quite often, your browser quickly redirects you to the production website instead. This is due to your database not yet being updated.

There are different places where the database needs updating. This also depends on the type of wordpress intallation: single, multisite with subdomains, or multisite with subdirectories.

The tables and field to change are listed in this post on “how to update urls in database after importing to local to solve redirection issues“. You do this directly in the Local database (not production) with myPhpAdmin, for instance. There aren’t so many places and fields.

When that’s done, you normally can access your local sites, local back-ends, and the links between them will mostly work.

The following might not redirect to local but still lead to production sites:

  • widgets for which you’ve hard-coded the website link
  • menu items, same situation
  • plugins that aren’t necessarily well coded and create files with hard-coded links upon installation

The other types of redirections you might look into are:

  • yoast SEO redirections, created automatically when you delete/rename a page
  • server-side redirections that help people who make typos or link to defective urls. These are stored in configurations files on the server. For servers running Apache, these are usually .htaccess files whereas for nginx running servers it’s usually a file that ends with nginx.conf

update urls in database after importing to local to solve redirection issues

Am setting up a local development environment for WordPress, using VVV vagrant. I already exported the original database from production and imported it in the local placeholder website.

  • Don’t modify the production database.
  • Only modify the local database.

For single-site installs, just replace the “siteurl” value in the “wp-options” from http://www.liveproductionsite.com to http://localtestsite.test

For multisite-installs, there are a few more hoops to jump through.

Remember: this impacts redirections. Your browser tends to remember these in its cache. Whenever you try something, make sure you clear all history so that past redirections won’t be remembered by the browser.

The tables you need to replace urls in for wordpress multisite on local are :

  • wp_domain_mapping
  • wp_sitemeta
  • wp_blogs
  • wp_options
  • wp_2_options, wp_3_options…
  • wp_site

And the fields to replace are:

  • siteurl
  • home
  • (possibly) vhp_varnish_url

Update siteurl in wp_domain_mapping

  • in the “wp_domain_mapping” table, replace the “domain” value from the live production values to the local test values. For instance: domain1.liveproductionsite.com to domain1.localtestsite.test

This will:

  • adjust/reset the main URL for the sites included to the local environment.
  • updates links that are automatically generated by the wordpress theme such as category menus and internal linking.
  • Also, it enables you to log into the back office (using your production wordpress logins).

What doesn’t work only with this:

  • images are still fetched from the original servers,
  • customized widgets and menu items still refer to outside locations.
  • Also, this doesn’t replace the network domain, which you can’t access at this stage

Import database with MariaDB and command line

Databases are easy to import through phpMyAdmin, but this interface has limitations. It doesn’t deal well with large files, since a timeout cancels whatever is ongoing.

For larger files, it’s better to go through command line. Here are the steps to get it done:

  • First, make sure you have an empty database to begin with. myPhpAdmin is great to create it or to drop the tables of a placeholder database. The database should exist and have a name, but no tables.
  • On your terminal, enter into your server (or virtual server) with ssh, for example vagrant ssh.
  • Then, call up mysql and check that the target database exists.
  • exit mysql with ctrl + d and type the following command to import a previous sql backup or export: mysql -u external -p targetdatabasename < /shared/sourcedatabase.sql

Exporting a huge SQL database

I had to copy over a wordpress database from production to my local server.

Export seemed ok, about 400+ mB but there would be errors upon importing in my local.

I kept getting the ERROR 1064 (42000) at line xxx: You have an error in your SQL syntax; check the manual that corresponds to your MariaDB server version for the right syntax to use near: ‘[extract from the SQL code]’.

The line number given seemed a bit off. I couldn’t find any typo or command that needed retyping. I tried to check the versions of MariaDB, and tried to export the file several times in different formats to check compatibility (MySQL40, MySQL343, etc).

Then I delved into the sql file and realized that:

  • the header was repeated partially at the very bottom
  • where the header started repeated, the previous SQL instruction was truncated.

So back to the export settings: I did two things and the result worked:

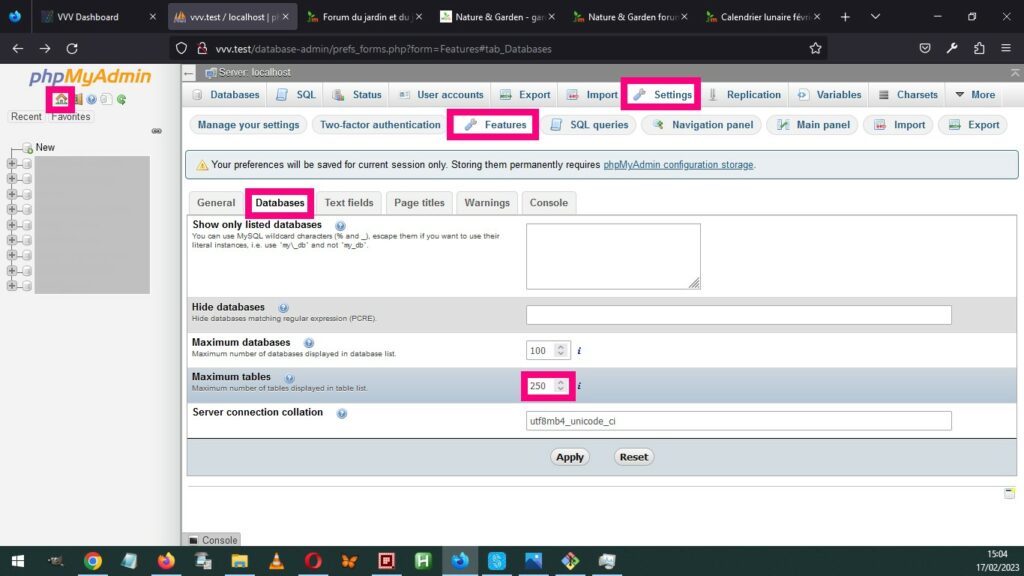
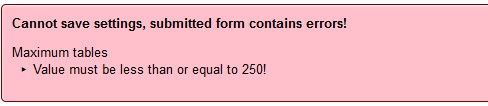
  • first, I double-checked and realized about 50 tables from the 250 weren’t checked, even though I had selected “Check all” on the tables page before clicking the “Export” tab. Turns out it only checks those printed on the page, so change your view settings to list them all. To modify how may tables are displayed in phpMyAdmin, follow these steps.
  • then, to clear my suspicion, I extended the maximum query length from 50,000 to 500,000.

Sometimes your connection is too slow, and / the database is so large that exports are only partial and interrupted. Often, there’s no error message, so you have to check differences manually at times (checking how many records are in each table is often enough).

If this is the case, a long workaround is to first export the database structure, without the data. Then, copy the tables one by one or several at a time. If you export both data and structure for the tables, you have to drop it first before re-importing it. If you only import the data, then you don’t have to drop the table, but know that it will append data – if your table isn’t empty, you might get duplicate records.

For truly large tables, you can also do the same: load the table without data, and then export rows one batch at a time. Take note of the start row and how many you want to export. Then, import the partial backups one after the other until your row count matches.

It’s surely quicker to work through mysqldump because phpMyAdmin isn’t made for large databases (…), but if you don’t know which login to use, you at least have this workaround.

Show databases on vagrant server

To show which databases exist on a vagrant virtual server, do the following steps. This supposes you already have a vagrant server up and running, for example VVV. It will list all current databases, like those of wordpress installs.

  • ssh into the server with vagrant ssh
  • from the root directory, type mysql to launch the MySQL monitor (often, MariaDB).
  • type show databases; and then press enter. Included databases appear in a neat table. Remember to add the “;” which is mysql’s way of marking the end of a command.

If you reprovision your vagrant, you should know that it will try to recreate the placeholder websites you used to set up your local copy. If you’re running git, it will give you an error message that it can’t download the vagrant custom template.

At this point it’s too late to cancel, but:

  • you can still salvage your database, provided the prefix isn’t “wp_” anymore. Indeed, tables with “wp_” will get squashed as vagrant uploads the dummy database if they have the same name. If you have a different prefix, your original tables won’t be lost, and you can just remove the wp_ones afterwards.
  • make sure you have a copy of your local wp-config.php file beforehand: adjusting those parameters is long, and if you saved a copy, you can just paste it back in place even before opening the website.
  • lastly, the theme for your website is hopefully stored on a git repository. When the new provision is finished, just delete the placeholder content and clone your website back to your local folder from the repository.

Find out the size of a database

This command lists the tables within an sql database by decreasing size:

SELECT TABLE_SCHEMA AS `Database`, TABLE_NAME AS `Table`, ROUND((DATA_LENGTH + INDEX_LENGTH) / 1024 / 1024) AS `Size (MB)` FROM information_schema.TABLES ORDER BY (DATA_LENGTH + INDEX_LENGTH) DESC 

Paste it in the “SQL” tab in phpMyAdmin. It won’t modify the database, since all it does is select entries and displays them.

Source: https://chemicloud.com/kb/article/determine-size-databases-tables-phpmyadmin/

Git fetch and git merge

After setting up an origin remote for your repository, you can pull the information in it down to your local computer.

You can either do it in one step with git pull, or two with git fetch and then git merge.

  • This will automatically look up the “origin” remote and fetch then information it contains. Once this has run, you are aware of the differences or changes compared to before, but nothing is yet committed: files in the folder are still just as they were before running the fetch command.

git fetch

The following is what creates a commit to change the information in the folders:

git merge

Change git remote origin

When you’re swapping out a placeholder wordpress site and database for an actual in-development site, you need to change the origin remote that your local folder refers to. Indeed, a good practice is to host your “reference” work on an outside repository, like github or gitlab. This means you must tell your local computer where to find this reference, the “origin” remote that it must track and push/pull to.

  • Navigate to the folder where you intend to synchronize your data.
  • If you’ve set up your installation without any placeholder website, and no origin has been set up yet, you’ll want to add an origin remote to git. That’s different from what we’re doing here, which is changing an existing origin remote: replacing the default placeholder one with the one we’re going to work on.
  • Go copy the URL of the repository that contains your reference work.
  • Type the following in your terminal (use Shift + Insert to paste what you just copied):
  • git remote set-url origin https://github.yourremoterepositoryurl

After running this command, you can check that the new origin URL is correct with :

git remote -v

It will show the origin URL to which the local folder will pull and push to/from.

Next step is either to use a git pull or git fetch.